Android开发高手课笔记 - Chapter04

Android开发高手课 【第四节】 课后作业解析 —— 内存监控,分析dump下来的内存快照

这一节的目的是监控内存的变化,课后主要是做了一个使用haha库检查dump下来的heap文件,如果包含两张一模一样的bitmap文件,则输出。

Demo内容

首先,需要将内存的Heap先dump下来,为了方便起见,这里直接显示的声明了一个文件。

1
2
3
4
5
6
7
8
9
10
11
12
13
14
15
16
17
18
19
20
21
22
23
24
25
override fun onCreate(savedInstanceState: Bundle?) {
super.onCreate(savedInstanceState)
setContentView(R.layout.second_activity)

val bitmap1 = BitmapFactory.decodeResource(resources, R.drawable.test)
val bitmap2 = BitmapFactory.decodeResource(resources, R.drawable.test)

img_1.setImageBitmap(bitmap1)
img_2.setImageBitmap(bitmap2)

btn_dump.setOnClickListener {
dumpHeap()
}
}

private fun dumpHeap(){
Runtime.getRuntime().gc()
Thread.sleep(100)
System.runFinalization()
val heapFile = File( "${Environment.getExternalStorageDirectory()}/heapfile.hprof")
if (!heapFile.exists()){
heapFile.createNewFile()
}
Debug.dumpHprofData(heapFile.absolutePath)
}

将内存快照dump下来之后,就可以使用我们打出的jar包去分析这个hprof文件了。以下就是如何使用HaHa库分析的代码:

1
2
3
4
5
6
7
8
9
10
11
12
13
14
15
16
17
18
19
20
21
22
23
24
25
26
27
28
29
30
31
32
33
34
35
36
37
38
39
40
41
42
43
44
45
46
47
48
49
50
51
52
53
54
55
56
57
58
59
60
61
62
63
64
65
66
public class Main {

public static void main(String[] args) throws IOException {
if (args.length <= 0){
return;
}

//获取hprof文件地址
String heapFilePath = args[0];
HprofBuffer buffer = new MemoryMappedFileBuffer(new File(heapFilePath));
HprofParser parser = new HprofParser(buffer);
//将hprof文件的buffer解析为快照
Snapshot snapshot = parser.parse();
//构造快照,如果不调用这个方法,后续生成的所有实例全部都是无引用
snapshot.computeDominators();
//获取到内存中bitmap的实例
ClassObj bitmapClass = snapshot.findClass("android.graphics.Bitmap");
//获取heaplist
Collection<Heap> heapList = snapshot.getHeaps();
Map<Integer, List<DetectorResult>> resultMap = new HashMap<>();
//遍历heapList
for (Heap h : heapList){
//仅仅需要处理app / default
if (!h.getName().equals("app") && !h.getName().equals("default")){
continue;
}

//当前堆上所有的bitmap实例
List<Instance> bitmapInstances = bitmapClass.getHeapInstances(h.getId());
//构造一个结果,主要是为了比较hashCode以及方便输出
List<DetectorResult> tempList = HaHaHelper.getDetectorResult(bitmapInstances);

//将每个result构造一个List做为value、result(也就是bitmap)的mbuffer的hashCode做为key存储起来,主要是为了找出是否有相同的key(可以视为是两个相同的bitmap)
for (DetectorResult temp : tempList){
List<DetectorResult> list = resultMap.get(temp.getBufferHash());
if (list != null){
list.add(temp);
resultMap.put(temp.getBufferHash(), list);
}else{
list = new ArrayList<>();
list.add(temp);
resultMap.put(temp.getBufferHash(), list);
}
}
}

//遍历map
for (Map.Entry<Integer, List<DetectorResult>> entry : resultMap.entrySet()){
List<DetectorResult> tempList = entry.getValue();
//如果value的size超过1,表示有两个相同的bitmap,将其结果输出即可。
if (tempList.size() > 1){
System.out.println("duplcateCount: " + tempList.size());
System.out.println("stacks [");
for (DetectorResult result : tempList) {
System.out.println("[");
System.out.println(HaHaHelper.getStackInfo(result.getInstance()));
System.out.println("],");
}
System.out.println("bufferHash: " + tempList.get(0).getBufferHash());
System.out.println("width: " + tempList.get(0).getWidth());
System.out.println("height: " + tempList.get(0).getHeight());
System.out.println("bufferSize: " + tempList.get(0).getBufferSize());
}
}
}
}

HaHaHelper:

1
2
3
4
5
6
7
8
9
10
11
12
13
14
15
16
17
18
19
20
21
22
23
24
25
26
27
28
29
30
31
32
33
34
35
36
37
38
39
40
41
42
43
public class HaHaHelper {

//构造一个Result,主要是为了输出
public static List<DetectorResult> getDetectorResult(List<Instance> dataList){
List<DetectorResult> resultList = new ArrayList<>();
for (Instance instance : dataList){
if (instance.getDistanceToGcRoot() == Integer.MAX_VALUE){
continue;
}
DetectorResult result = new DetectorResult();
result.setInstance(instance);
result.setWidth(fieldValue(((ClassInstance)instance).getValues(), "mWidth"));
result.setHeight(fieldValue(((ClassInstance)instance).getValues(), "mHeight"));
ArrayInstance bufferInstance = fieldValue(((ClassInstance)instance).getValues(), "mBuffer");
result.setBufferSize(bufferInstance.getSize());
result.setBufferHash(Arrays.hashCode(bufferInstance.getValues()));
result.setClassName(instance.getClass().getName());
resultList.add(result);
}
return resultList;
}

//获取instance相应的属性值
public static <T> T fieldValue(List<ClassInstance.FieldValue> fieldValues, String name){
for (ClassInstance.FieldValue fieldValue : fieldValues){
if (fieldValue.getField().getName().equals(name)){
return (T) fieldValue.getValue();
}
}
throw new IllegalArgumentException("not find field that pointed");
}

//调用链输出
public static String getStackInfo(Instance instance){
StringBuilder sb = new StringBuilder();
while (instance.getNextInstanceToGcRoot() != null){
sb.append(instance.getNextInstanceToGcRoot()).append("; \n");
instance = instance.getNextInstanceToGcRoot();
}
return sb.toString();
}

}

DetectorResult:

1
2
3
4
5
6
7
8
9
10
11
12
13
14
15
16
17
18
19
20
21
22
23
24
25
26
27
28
29
30
31
32
33
34
35
36
37
38
39
40
41
42
43
44
45
46
47
48
49
50
51
52
53
54
55
56
57
58
59
60
61
62
63
64
65
66
67
//结果类
public class DetectorResult {

private String className;
private int bufferSize;
private int width;
private int height;
private int bufferHash;
private Instance instance;
private int duplcateCount = 1;

public void setInstance(Instance instance) {
this.instance = instance;
}

public void setDuplcateCount(int duplcateCount) {
this.duplcateCount = duplcateCount;
}

public int getDuplcateCount() {
return duplcateCount;
}

public Instance getInstance() {
return instance;
}

public void setClassName(String className) {
this.className = className;
}

public void setBufferSize(int bufferSize) {
this.bufferSize = bufferSize;
}

public void setWidth(int width) {
this.width = width;
}

public void setHeight(int height) {
this.height = height;
}

public void setBufferHash(int bufferHash) {
this.bufferHash = bufferHash;
}

public String getClassName() {
return className;
}

public int getBufferSize() {
return bufferSize;
}

public int getWidth() {
return width;
}

public int getHeight() {
return height;
}

public int getBufferHash() {
return bufferHash;
}
}

上面就是分析heap的三个关键类,完成后,我们直接将手机中的hprof文件pull到本地,然后运行jar包,就可以得到如下的输出:

1
2
3
4
5
6
7
8
9
10
11
12
13
14
15
16
17
18
19
20
21
22
23
24
duplcateCount: 2
stacks [
[
android.graphics.drawable.BitmapDrawable$BitmapState@316857808 (0x12e2ddd0);
android.graphics.drawable.BitmapDrawable@316881648 (0x12e33af0);
android.support.v7.widget.AppCompatImageView@316906496 (0x12e39c00);
android.view.View[12]@316598912 (0x12deea80);
android.widget.LinearLayout@316904448 (0x12e39400);
android.support.v7.widget.AppCompatButton@316908544 (0x12e3a400);

],
[
android.graphics.drawable.BitmapDrawable$BitmapState@316857864 (0x12e2de08);
android.graphics.drawable.BitmapDrawable@316881720 (0x12e33b38);
android.support.v7.widget.AppCompatImageView@316907520 (0x12e3a000);
android.view.View[12]@316598912 (0x12deea80);
android.widget.LinearLayout@316904448 (0x12e39400);
android.support.v7.widget.AppCompatButton@316908544 (0x12e3a400);

],
bufferHash: 1995771565
width: 179
height: 179
bufferSize: 128164

关于打jar包时遇到的一些问题

在做课后demo的时候,遇到了一个问题就是在使用gradle 的 java plugin 的时候,当打包成jar包之后,发现没有将第三方的依赖打入jar包。检查后发现是声明依赖与configurations获取依赖不一致导致的,以下是修改之前的gradle文件:

1
2
3
4
5
6
7
8
9
10
11
12
13
14
15
16
17
18
19
20
21
22
23
24
25
26
27
28
29
30
31
32
33
34
35
36
37
38
39
40
41
42
43
44
45
apply plugin: 'java'

version 1

dependencies {
implementation fileTree(include: ['*.jar'], dir: 'libs')
implementation files('libs/haha-2.0.4.jar')
implementation files('libs/trove4j-20160824.jar')
}

sourceSets {
main {
java.srcDirs = ['src']
}
}

jar {

manifest {
attributes 'Main-Class': 'com.hprof.bitmap.Main'
attributes 'Manifest-Version': version
}

from {
exclude 'META-INF/MANIFEST.MF'
exclude 'META-INF/*.SF'
exclude 'META-INF/*.DSA'
exclude 'META-INF/*.RSA'
configurations.compile.resolve().collect {
println(it.name)
it.isDirectory() ? it : zipTree(it)
}
}
}

// copy the jar to work directory
task buildAlloctrackJar(type: Copy, dependsOn: [build, jar]) {
group = "buildTool"
from('build/libs') {
include '*.jar'
exclude '*-javadoc.jar'
exclude '*-sources.jar'
}
into(rootProject.file("tools"))
}

可以看到,dependancies声明的时候,我使用的是 implementation 而在下面的 task 中,在遍历依赖树的时候,使用的是 configurations.compile ,这时得到的 compile.size() 为0。很明显是因为依赖没有获取到。Java 的classpath 分为 compile-classpath 以及 runtime-classpath。所以需要首先了解到 implementation 是对应的哪一种运行环境,可以从gradle的官方文档中了解相关的信息:Java_libiary_configurations_graph

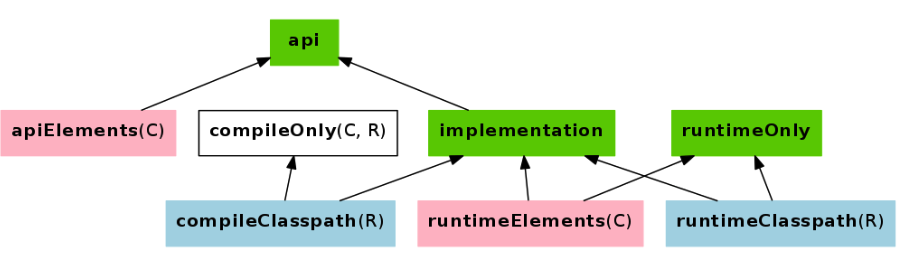
上图是官网中的一张图,可以看到 implementation 应该使用 compileClasspath 或者 runtimeClasspath ,而官方也建议使用 implementation代替 compile ,下面是gradle blog对于应该使用哪些声明的一些建议:

More uses cases, more configurations

You might be aware of the compileOnly configuration that was introduced in Gradle 2.12, which can be used to declare dependencies which are only required when compiling a component, but not at runtime (a typical use case is libraries which are embedded into a fat jar or shadowed). The java-library plugin provides a smooth migration path from the javaplugin: if you are building an application, you can continue to use the java plugin. Otherwise, if it’s a library, just use the java-library plugin. But in both cases:

  • instead of the compile configuration, you should use implementation instead
  • instead of the runtime configuration, you should use runtimeOnly configuration to declare dependencies which should only be visible at runtime
  • to resolve the runtime of a component, use runtimeClasspath instead of runtime.

根据上面的一些分析,只需要把 上面的 build.gradle 中的 configurations.compile 修改为 configuration.compileClasspath 就可以了。此时,打出的jar包中也会包含有三方依赖。